Friday, March 27, 2020

Don't Make Me.....


Welcome to another challenge with Sketch Saturday.

Here is sketch #603


And as you can see I turned mine 90 degrees clockwise.  With sketch challenges you can do this. 


I finally got to play with my Kindred Stamp set Protectors Of the Throne.  An add on set to both Royal Throne and Heirs to the Throne
I used to mix and match other character from a few sets to make this character.  But now she has a stamp of her own.  
One good thing about using sketches you can mix it up a little and still keep it looking clean and simple.  

Don't forget to pop over to Sketch Saturday and play along with the challenge each week.  While you are there why not check out what the other DT members have created.
I hope you get to enjoy some time in your crafting space and don't forget to share your creations for a chance to win! 

Wednesday, March 25, 2020

Crafty Christmas Club - March Edition


No photo description available.
Can you believe that we are even thinking about Christmas already?

Well some of us are.  With the world going crazy right now it was nice to focus on something else.  Crafting is a great way to take your mind off things.
On the 25th of each month we will be sharing a Crafty Christmas Club blog hop.  Which works out perfectly, because by the time Christmas actually arrives, we will have our stash of cards ready to send out.  #organizationskills !
Here is my project this month


Isn't this image the cutest!  It was from the Craftin Desert Diva digi stamps.  Sadly the shop shut last year, but I still have the image to use.  And I finally used one of my first original Spellbinder nestabilities sets.  The square and the square scallop.  So nice to revisit an old friend...hehe.

Here is the list for you to go visit everyone's creations.  Thanks for stopping by.

Blog Hop

Tanya Boser

Sue Plote

Me ( you are here!)

Marcia Caradinta

Justin Averill

Instagram

Tanya Boser

Suer Plote


Sunday, March 8, 2020

Arty This Is The Way

Hehe, I am back again!!!

Yes.  I could not help myself once again.  This time I am sharing with you something that amazed even me.  Never in a million years would I have thought I could do this.  

I had this card in my head.  One of those ideas you get and you have to make it to get rid of it.
Now, as there are no stamps out there of giant legs walking I had  to figure something out.  So I did google the human character that goes with our lovable alien.  And I needed the foot ,closest to the baby, to be grounded.  I could only find one that was the left foot grounded.  So I saved the picture, and flipped the image. 

Here is the image I saved for inspiration.

I hand drew the boots onto my card front. Then proceeded to match up as best I could with my Copics without making the picture too dark.  Here is the result.


I was tempted to draw black lines on the boots etc to match our friend but chose not to.  I honestly didn't want to mess with the end result.  Maybe I should have use the Ink On 3 ink that disappears to leave a no line baby.  As this is not a card for my stall, I chose to leave it.  I honestly don't want to stuff it up.  I have decided I will put it in a frame so I can look at it.  I don't make any cards for me. 

Now I wish I could share the copic colours I used, but seriously, I lost which colours went where as I was concentrating too hard to write any down.  As I was working I was so engrossed in the process that my left hand held a bunch of pens.  As I finished with one colour I added to my hand, not wanting to lose that colour amongst the mess on my desk.  I put down about 4 handfuls before the end.  
I will say I used some blue and some green in those boots.  Who would have thunk it?  Not me.  A lot of E's, W's, and some T's and C's. And the odd prismacolor pencil to add the finest of definitions that a copic marker cannot give.

After all the stressing and nearly tossing it half way through the first leg, I have to say I enjoyed myself.  The challenge was definitely there. I think I will try doing something like this again one day. When colouring a section at a time, I had to stop feeling like this was a mess.  Looking too closely at each section as you colour it can do your head in.  You have to step back and take in the whole picture.  

 Not sure when but I will. I will also open the Ink On 3 pad that disappears to leave no lines.  I think it will be a very interesting experiment.  

Thank you so much for taking the time to view this project.  
💚

This Is The Way As Well

Don't you just love it when you get on a creative roll?

I have been struggling the last few weeks but all of a sudden I am back.  And this project is no exception!

This set is from This Is The Way and Baby On Board from Ink Road Stamps.


This would have to be my all time fav I have made in a long time.  And I don't normally do a black background but this sets off the coloured images and diecut perfectly.  

The colour combo's are the same as the previous post but I used E79 E77 E74 E71 for the bowl the middle image is using to drink from.  

I thank you for popping by and taking the time.  I really do appreciate every view I get.  Have yourself a great day!

Saturday, March 7, 2020

This Is The Way

Well that didn't take long.  
I am back with my first project with the cute set
from


The background embossing folder is an old Stampin Up one I had in my stash, and the decorative cog die is one I have in my stash also.  I rubbed some black paint on to the silver foil embossed card front.  

That is real sand in the window panel.  I pinched it from the kids sand pit they no longer use. 
The sentiment came from Ink Road Stamps.  I coloured 30 little characters so I have a ton to use.  I also hand cut each one.....Santa still has not brought me a scan n cut....lol.  I threw a few around the card because you can never have enough of him/ her. 

And I also used the sketch from Sketch Saturday
This is this weeks sketch.


If you play along as well you will have a chance to wind a prize! 
Till the next project.....

Friday, March 6, 2020

Chickie Nuggies

Quick little share.

I finally received my very cute stamp set 


Here are the copic colours and order I laid them down.


Behind the character YR24
Shadow areas on character G85
Pod and cracks T5 and shadow on left of character &T7
Penciled in little square buttons on front between hands
Clothes E44
Ear R02

On left of character T5 over YR24
Character G43
Pod T3
Clothes E43
Ear R01


Character G40
Pod T1
Ear G40 over the pink


Pod T0
  Now that I am done, suddenly I am craving chocolate milk......sic!
Stay tuned for projects featuring this little guy (or girl)

Monday, March 2, 2020

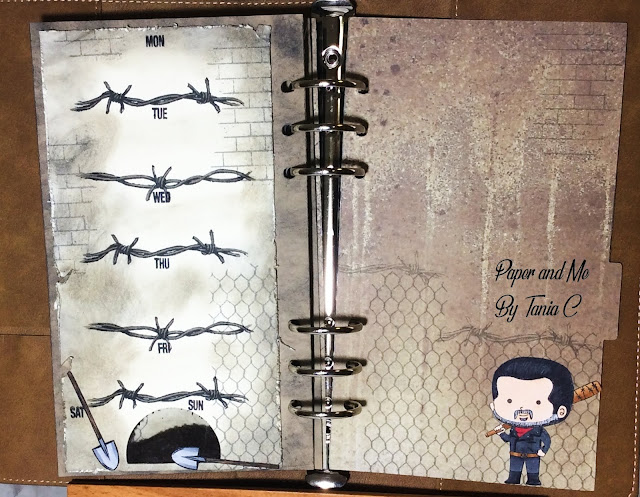
March Planner - Zombies

Back again!  I cannot believe how much crafting I have gotten done in the last couple of days.

After last week, when I had no mojo, this week I am totally inspired. Amazing what a couple of days of procrastination can do....hehe.  

Today I share with you my latest foray into the world of planners.  This is my March effort.  It won't be hard to pick this theme.  


This is the first page opening.  I have used so many sets.  May have even only been 1 or 2 stamps out of each one but it was totally worth it.  


Opening number 2.  
Each of those "date" do dads (what else do I call them? Lol) are slotted in the front front pocket.  I can write a date on them and what it is for and place them on any given day.  Cool hey!


This is opening 3.  The very middle.  Those rectangles are for me to fill in with projects I want to make over the course of this month.  


Opening 4.  Now this is the really cool bit!  I added a acetate window at the bottom of this layout.  And I filled it with tea leaves!  The best dirt when not using dirt.  


This is sooo cool!  I should have put a light behind so you could see it better but I am sure you get the idea.  


Last page.  Now I did spend way too much time making this.  I do feel it was worth it.  I have been feeling like I have been in a bit of a slump the last week or so with creating.  And this has brought me back!

Now the characters are from the set   Surviving Zombies by  Kindred Stamps.  And looking at their site it has been retired.  Boo!  But these layouts just go to show what you can do with a theme if you have the right stamps.  

Smile

Back at it today.
  
I have been playing with my Uniquely Creative sets today.  And the one I will share with you now is 

Living here in Australia it is so good to have an Aussie brand to buy, and the fact they come out with some beautiful designs does not hurt one bit!  Hehe.


It is hard to see in the photo but there is an embossed background (not sure of the name of it but it is cool!)  I just love the colours of the bird of paradise flower.  Very different from any colour combo I have used before.  
The Smile and Sentiment is from My Favorite Things.  I have so much of their stuff we jokingly refer to it as Tania's Favorite Things...lol.  

I am sure this will not be my last card using this set.  Who doesn't need a tropical flower in their life?  Especially on a card!

Sunday, March 1, 2020

APTTC - Sheepski Designs

Hi and welcome to another A Perfect Time To Craft blog challenge.  This months sponsor is 

If you head on over to the blog here and check out all the details. The theme is"Anything Goes".


I use this cute little gnome couple.  Giant Mushroom
The background is a MFT background stamp that randomly coloured the triangles in with water and ink. 

Don't forget to play along for your chance to win, you must play along. 

Owl-some Owls

  Today is  Ink N Splatter time. I had the privilege of playing with the new release Owl-some Owls stamp set.  I also used the paper pack ...